User Master
Register team members, assign roles, manage permissions, and reset passwords
User Master
User Master is a settings screen for registering team members who will use EXAWin, and managing their roles, permissions, and statuses.
Only users with the admin or super_user role can access this menu; it is disabled for other roles.
Location: Sidebar → Settings → User Management
Screen Layout
Top Stats Bar
The following information is displayed at a glance at the top of the screen:
| Item | Description |
|---|---|
| Total Users | Total number of registered users |
| Active | Number of currently active users |
| Inactive | Number of deactivated users |
| Seats | In use / Maximum licensed seats (e.g., 5 / 10) |
When all seats are in use, a FULL badge is displayed and no new users can be added.
User Table
All registered users are displayed in a table format.
| Column | Description |
|---|---|
| Name | User name (inline editable) |
| Company | Company name |
| Email address (inline editable) | |
| Role | Role selection (dropdown) |
| Status | Active (Y) / Inactive (N) — click to toggle |
| 💲 | Permission to view financial information (checkbox) |
| 💼 | Permission to access Project Master (checkbox) |
| Last Login | Last login date and time |
| Created | Account creation date |
| Deactivated At | Deactivation date |
| Actions | Save, Reset Password, Send Invitation Email, Active/Inactive Toggle, Delete (disabled) |
Inline Editing — Modify Name, Email, or Role fields directly in the table, then click the Save (💾) button to apply changes immediately.
Each column header has a filter input field below it for quick searching by name, company, email, or role.
Role System
EXAWin supports 4 roles:
| Role | Description | Key Permissions |
|---|---|---|
| Member | Regular team member | Record and view activities within assigned projects |
| Manager | Manager-level | Member permissions + view and approve team activities |
| Admin | Company administrator | All permissions + user management, system settings |
| Super User | Top-level administrator | Admin permissions + full system access |
⚠️ Changing a role may automatically synchronize the user's project memberships.
Individual Permission Settings
Independently from their role, each user can be granted the following permissions:
- 💲 Can View Financials — Permission to view financial data such as expected revenue. Users without this permission will see all financial fields as blank across all screens.
- 💼 Can Access Project Master — Permission to create and edit projects in the Project Master screen.
Permissions are automatically saved when the checkbox is clicked.
Adding Users
1. Click the + Add User button at the top right of the screen.
2. An input row appears at the top of the table. Enter the following information:
| Field | Required | Description |
|---|---|---|
| Name | ✅ | User name |
| ✅ | Email used for login | |
| Role | — | Role selection (default: Member) |
| 💲 | — | Financial information viewing permission |
| 💼 | — | Project Master access permission |
3. Click the ✓ (Confirm) button to create the user.
4. Upon creation, a temporary password is displayed in a popup.
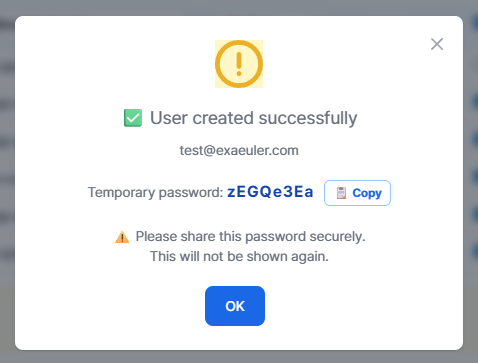
⚠️ The temporary password is only visible at this point. Use the 📋 Copy button to copy it and securely deliver it to the user. The user can change their password in their profile after the first login.
Seat Limit — The Add User button is disabled when the company's licensed seats are fully occupied. If additional users are needed, click the 👑 Upgrade button in the top stats bar to upgrade the Licensed Seats for the Professional plan.
User Actions
The following actions are available in the Actions column at the far right of the table:
💾 Save
Saves changes made through inline editing of Name, Email, Role, and permissions.
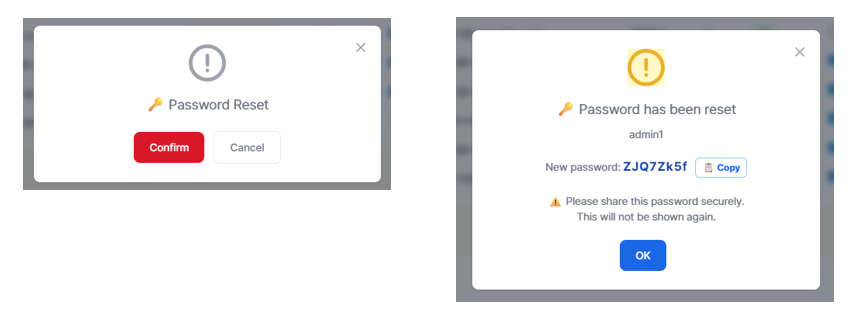
🔑 Reset Password
If a user has lost their password, they can click "Forgot Password?" on the login screen to reset it via email verification. Alternatively, an administrator can reset the password, generating a random temporary password. After confirmation, the new temporary password is displayed. The administrator should securely deliver the password to the user, who should change it in their profile after their first login.
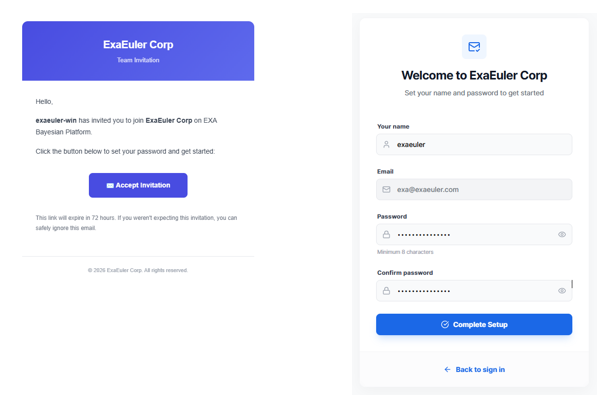
✉️ Send Invitation
After registering a new user, the administrator can send an invitation email. The invitation link is valid for 72 hours. When the user receives the invitation email and clicks the Accept Invitation button, they are directed to the login screen where they set their password and log in. The password set at this point becomes their official password, so there is no need to change it separately.
Password Issuance Methods (3 Options)
- Admin reset and internal delivery — Admin resets the password and delivers the temporary password directly to the user.
- Invitation email — Send an invitation email to a new user so they can set their own password.
- User self-service — The user clicks "Forgot Password?" on the login screen to reset via email verification.
👤 Toggle Active/Inactive
- Active → Inactive: Blocks login for the user. The deactivation date is recorded.
- Inactive → Active: Re-enables login for the user. However, activation is rejected if the seat limit is exceeded.
⚠️ You cannot deactivate yourself.
🗑️ Delete
User deletion is not possible. Only deactivation is supported to maintain data integrity.
Excel Export
Click the Excel button at the top right of the screen to download the user list as an .xlsx file.
The Actions column is automatically excluded from the export.
Security Policies
| Policy | Details |
|---|---|
| Minimum Password Length | 8 characters minimum |
| Login Attempt Limit | Account locked for 15 minutes after 5 consecutive failed attempts |
| Invitation Link Validity | 72 hours |
| Password Reset | Randomly generated, displayed once, cannot be retrieved afterwards |
Important Notes
⚠️ When a user is deactivated, they immediately lose login access. Past activity data of deactivated users is preserved.
- When a role is changed, project memberships are automatically synchronized.
- The Admin role grants access to all settings menus for that company, so assign it carefully.
- Roles and permissions are managed within the same company.